1. How the free trial works
What can I do during the free trial?
During your free trial you can fully test Hublead, including importing contacts from LinkedIn into HubSpot, up to a small limit. You will get access to the Scale plan, which will allow you to test all the features available.
The trial is limited to importing 10 contacts or to 2 weeks of usage, which is usually enough to understand how Hublead fits into your workflow.
You can also watch the Hublead demo (linked in-app) if you prefer a short walkthrough before committing to a paid plan.
What happens when my trial ends or I hit the trial limit?
When you reach the trial limit:
- You’ll stop being able to import new contacts and messages via Hublead, you are now on the Starter plan (free plan) where you can only view HubSpot data on LinkedIn.
- Your existing data in HubSpot stays where it is.
- To keep using Hublead with no limits, you’ll need to switch to a paid plan (see section 2).
If you feel you didn’t get the chance to properly evaluate Hublead, you can:
- Watch the demo linked from the trial message.
- Reach out to Support with any specific questions about your use case so they can help you evaluate next steps.
What pricing options are available after the free trial?
After your trial, you can choose any of the paid plans (Professional, Business, Scale). You’ll find the latest pricing and feature comparison on the Hublead pricing page.
- Pricing is per user (per seat) – see “Other billing FAQs” below.
- You can also choose billing frequency (monthly, yearly), with discounts for longer commitments (details below).
I ran out of time before my trial ended. What can I do?
If your trial finished and you feel you didn’t manage to test everything:
- Start from the demo to quickly see the main workflows.
- Share your specific questions or use case with Support; they can help you understand whether Hublead fits and how to set it up so you’re not starting from zero on a paid plan.
2. Change your plan or number of seats (upgrade/downgrade)
You can upgrade (higher plan / more seats) or downgrade (lower plan / fewer seats).
The exact flow depends on whether you are a new customer or you already have an active subscription.
A. If you are new to Hublead (no active subscription yet)
1. Go to app.hublead.io > Settings > Plans.
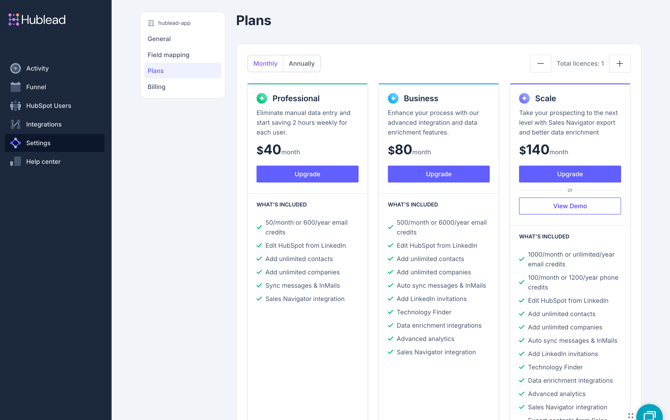
2. Choose the plan you want.
3. Set the number of licenses you need:
-
-
Increase the number to add seats.
-
Decrease the number to reduce seats.
-
4. Complete the checkout in the Stripe portal
Once the subscription is created, proceed to the Team page to assign seats (see section “Assign seats to your users” below).
B. If you already have a Hublead subscription
- Go to app.hublead.io > Settings > Plans
- Click Manage subscription.
- In the Stripe portal, update:
- The plan (e.g. move from Professional to Business, or vice versa).
- The number of licenses (increase to add seats, decrease to remove seats).
- Confirm the changes in Stripe (only if it’s an upgrade)
Your upgrade or downgrade takes effect immediately, and your billing is updated automatically based on the new plan and seat count.
3. Download past invoices & receipts
You can access all your previous invoices and receipts directly from the Hublead app.
-
Go to Settings > Billing:
https://app.hublead.io/settings/billing -
Make sure you’re in the correct workspace/account if you manage multiple workspaces.
-
In the billing history, find the charge by date.
-
Click the entry to view and download the PDF receipt.
If a receipt appears to be missing, contact Support and share:
- Payment date
- Invoice ID (if available)
This helps the team quickly locate and resend the correct invoice.
4. Cancel your subscription at the end of the current billing period
When you cancel, your subscription will stay active until the current billing period ends, and then it will not renew.
How to cancel
- Go to app.hublead.io > Plans.
- Click Manage Subscription.
- Select Cancel plan and confirm.
What happens next:
-
You retain full access to Hublead until the period end date shown in your billing details.
-
After that date, your plan automatically ends and will not renew.
-
You can always double-check the exact end date on your Billing page:
https://app.hublead.io/settings/billing
If you can’t access Billing for any reason, contact Support and they can help confirm or process the cancellation for you.